Getting Started With obs Plugins on Windows
obs-studio provides its own documentation on how to get started. They also provide the obs-plugintemplate repository which is a fully set up template, you can use to create your own plugin. It is highly recommended as it contains various scripts for all aspects of the plugin’s development cycle, including configuration, building, packaging etc.
The repository uses CMake . It includes presets based on OS. It also includes GitHub Actions providing you with CI support. And lastly it also contains dependency downloading.
buildspec.json #
Let’s take it from the beginning. Its contents are:
| |
Starting off with the bottom section, it contains the normal metadata information you would expect of any plugin or package, like author, plugin name etc. Take a moment to fill in all the necessary information for this. Also take note you’ll need to generate a GUID/UUID for the windowsApp and also make sure to change the bundleId for mac to something valid.
| |
The dependencies property contains a list of dependencies for the plugin to build. The archives listed are a) the obs-studio sources, b) the dependency repository with the third party libraries required to build obs-studio( obs-deps ) and c) Qt for the UI.
First and second archives are straightforward. They provide the libraries and headers you need to link against, in order to build the plugin.
Qt is optional. It will be needed only if you want to create a UI for your plugin. There is a CMake option for it and it’s also referenced by CMakePresets.json . More on that later.
The provided buildspec.json also defines the version of obs you will be developing against and supporting.
To update the dependencies, change the version first and then the hashes per platform. For obs-studio , the version is the literal version of the obs build/release. For the dependencies, both obs-deps and Qt , the version is the tag of the release (and part of the release name). The hashes can be found in the Release section of the obs dependencies repository and the obs studio repository respectively and are all SHA256 CRCs of the equivalent download as shown below:
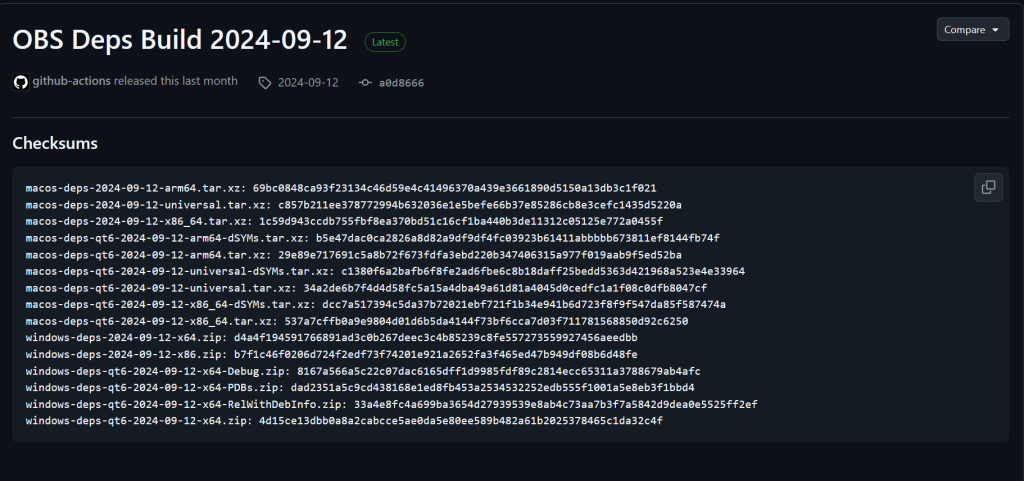
In the unlikely case the hash for an entry is not there, you have 2 options. You can download the entry and run CRC calculation on it yourself. I use 7zip and it’s:
| |
Or just run with whatever hash is already there in the buildspec and wait for CMake to fail. The log will give you both what CRC it got from buildspec and what it expected to see (by calculating the CRC after download). In the example below, expected is what buildspec provides and actual is what was calculated from the file after download. Obviously this isn’t an ideal option, seeing as it circumvents its reason for existing, but it will allow you to move on
| |
CMake #
Make sure you have a CMake version installed that’s within the range of versions supported by the project. You can find out the minimum version by taking the max out of 1)CMakePresest.json’s property and 2) the minimum of the range in the root CMakeLists.txt (both of which are shown in the subsequent subsections).
To save yourselves some trouble, make sure CMake is in the PATH environment variable, especially if you intend to use an external terminal.
In vscode, you can also install the twxs.cmake(language support) and the ms-vscode.cmake-tools(various tools and settings for a CMake workflow) extensions to help you with CMake.
CMakePresets.json #
This template project is using the new CMake approach where you define presets in a CMakePresets.json file for almost every different aspect of the workflow and those presets are then fed to the CMake files and executed.
The following blocks are intentionally incomplete. I omitted a few presets for simplicity. There are 3 sections to go through.
| |
Firstly, version determines the capabilities of CMake you can utilize and cmakeMinimumRequired will tell you the minimum version of CMake you need installed in your system for this project to be built. It will be mentioned again in the CMakeLists.txt section.
| |
Configure presets, as implied, is a collection of options you can provide CMake configure with. The most notable part is in the template preset which is the base preset all others inherit from. You’ll notice it contains both optional switches, the Frontend API and the Qt framework, which are both listed in the plugin template repository’s README.
Another interesting part is that you can define CMake variables here to be cached for subsequent executions (see cacheVariables property). If you need anything extra, you’ll have to modify the presets themselves. Moreover the windows preset uses VS2022 as the generator and will produce a VS solution in the build_x64 folder. Even though it’s my main IDE of choice, I opted to use vscode and CMake instead.
| |
As for build presets, you’ll notice that all of them are in Release mode, with the windows preset being Release with PDBs(RelWithDebInfo).
CMakeLists.txt (root) #
Before executing anything, let’s look at the root level CMakeLists.txt.
This is the main script that controls the compilation and linking of the final product.
You can see the options for enabling Frontend and QT here set to OFF, but they will be overridden by the values, mentioned before, in CMakePresets.
| |
The only part you need to care about is the target_sources directive. You basically need to add any .c/.cpp files in that list, once you have more files to add.
Configure #
In the Terminal tab, execute the following:
| |
CMake will cycle through various tasks to set up your project, including downloading the dependencies and generating the solution and other artifacts for building, in the build_x64 folder.
In the beginning of the execution log, you can verify the Frontend and Qt options are set to the values of the template preset (or any other override you may have used). After going through some detection tasks, it will start downloading the archives for the dependencies and they will be set up in a .deps folder within the project’s root folder. Note that upgrading/downgrading versions keeps any versions previously downloaded. Whether you delete or keep them, is your prerogative.
Once the dependencies are downloaded, the build_x64 folder is finalized.
Build #
To build, execute the following in the terminal:
| |
The preset dictates the configuration, which defaults to ReleaseWithDebInfo, and it is omitted.
plugin-support.lib created as well, which we also know about because the plugin-support.h is included in plugin-main.c. By the extension, you can glean that it’s a static library. On link time, it will be embedded to the final binary, which in this case is a dll file, [your-project-name].dll.Install #
Using CMake’s install functionality, we can deploy the previously built files where we like and how we like. More specifically, that last part from the root level CMakeLists.txt is where the install step is invoked.
| |
This function is located in the helpers.cmake in cmake\windows.
In this function we can see the install call:
| |
Install defaults to using CMAKE_INSTALL_PREFIX as the location for those relative paths. If CMAKE_INSTALL_PREFIX is not set, it defaults to the following:
c:/Program Files/${PROJECT_NAME}on Windows./usr/localon UNIX platforms.
as per the CMake documentation.
This is obviously not going to work, so set some value for it in the CMakePresets.json in the cacheVariables property of the relevant presets.
Program Files.Among other things, set_target_properties_plugin checks if the OBS_BUILD_DIR variable has been set and if so, will deploy all files there as well.
OBS_BUILD_DIR unless you have also set CMAKE_INSTALL_PREFIX and expect both of them used for deployment, because as explained earlier, the default path will ensure the execution fails, before it even tries to deploy in OBS_BUILD_DIR.Initially, I had set CMAKE_INSTALL_PREFIX to .\release, which is also the path used by the Powershell scripts the Github Actions expect. Alas, this is not the recommended way, since those Powershell scripts are designed to be used in a CI context alone, regardless of working for local builds as well.
The structure looks like: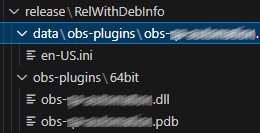
The data folder contains assets and the localizations mostly. Both data and obs-plugins mimic the directory the plugin is supposed to be installed under, in obs’ ProgramFiles install folder.
Testing #
The easiest way I can think of, for testing your plugin code, would be to go to obs-studio GitHub, at the Releases and download the latest portable obs and its pdbs.
Deploy it in a directory next to your project’s root folder and use vscode’s launch.json to define a configuration for running an executable with a debugger attached.
An example of the .vscode/launch.json:
| |
It will use the VS debugger within vscode to launch the executable defined by program with current working directory cwd. Both are set up with relative paths from the workspace folder. By default, using the Add Configuration button in the opened launch.json, select the C++ (Windows) Launch option. There will be an extra property added, compared to the json block above, which defines whether to use an external terminal to launch the program from, called externalConsole. I’ve removed it so that we can use the integrated Debug Console.
Now that the portable obs-studio is installed, we can add a step to install the built plugin files into the right folders of the portable studio’s directory.
We can use CMAKE_INSTALL_PREFIX to point to the portable obs directory.
To achieve that, we’ll modify the windows-x64 configure preset in CMakePresets.json again:
| |
It is recommended to delete build_x64 and re-run the cmake configure step in order to properly cache the new CMAKE_INSTALL_PREFIX location.
Re-run the cmake install step to deploy and check, in the Output window, that the correct path was used.
Hit run in the Run and Debug tab of vscode and it will run obs with the plugin. If there’s any issue with your plugin code, the debugger will break.
Apart from using breakpoints, you can review the current obs session log in the Debug Console.
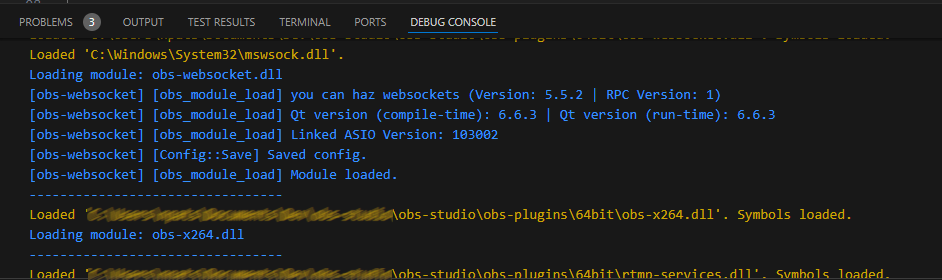
Make sure to check it out as it shows various information about the running state, about other modules (plugins). For instance, you can verify the plugin was loaded by filtering for the name of your plugin or Loading module * which you can see in the image above is what obs writes for each plugin.
Integrating Portable obs as a dependency #
It is possible to add the portable obs as a dependency in the buildspec and streamline its setup and potential future updates.
First, add entries in the buildspec’s dependencies section.
| |
This is merely replicating the way other dependencies are set up. We use the CRCs of the zip files involved in the platforms we are interested in.
The second step is to incorporate them to the same CMake file that handles their download and verification, which is buildspec.cmake in cmake/windows.
Add the following right before _check_dependencies():
| |
The reasoning of this setup is that we are defining a template for the filenames we expect to access, replace the VERSION placeholder based on buildspec.json and then concatenate to the url, also provided by buildspec.json, to get the final url for download.
Equally, the destination is also a templated folder name that, much like the other dependencies, will be placed under the .deps folder.
The final step is to modify the CMAKE_INSTALL_PREFIX in the cacheVariables property of our configure preset in CMakePresets.json, to point to this new directory within .deps.
If the .deps folder is deleted, the testing obs will be downloaded and set up much like the rest and provided the relative paths in CMAKE_INSTALL_PREFIX are correct, you can debug out of the box.
Disclaimer: I did try to use the already downloaded obs-studio repository clone in .deps, but unfortunately it’s not possible to build it without the necessary submodules. And those can only be downloaded using git submodule commands, but since the archive we download lacks the .git folder, it’s not possible to run those. I know it is a waste of space, but changing the provided CMake scripts to download the full thing is more of a change than I’m comfortable making. To be honest, I did not like modifying the .cmake files to integrate the portable obs as a dependency, but I do not know of a way to additively hijack CMake without, at the very least, in include within the root CMake. As a result, getting updates from the plugintemplate will involve manual work.
Tasks.json #
In case you didn’t install the previously recommended CMake extension, you can use the following tasks.json:
| |
It creates tasks for each cmake stage you need. They are all executed in a shell and provide all the necessary arguments.
You need to use Tasks: Run Task or Tasks: Run Build Task for them to be ran.
Overriding problemMatcher with an empty one, gets rid of the dropdown options after choosing which task to run, which talk about scanning output of a task for problems. This is connected to the Problems tab in the integrated terminal.
The presentation bundle deals in how the terminal that will be summoned for this task behaves. It makes sure the terminal that gets summoned gets focus, is shared meaning all queued tasks will run in the same terminal instance, is not cleared after each task executes, does not close after all of them finish, And showReuseMessage is false so you don’t have to see the message about the terminal being reused. Unfortunately I haven’t found how to keep the terminal open only in case of failure and close it on success.
If you did install the ms-vscode.cmake-tools extension, it will create Commands you can instantly use from the Command Palette without using any of the Tasks: Run.. commands. You will find that it adds the following CMake Commands:
CMake: configureCMake: buildCMake: install
First use will require you to write CMake to get the list of possible commands, but after first use, they will popup as soon as you summon the Command Palette.
Packaging #
There are two options for packaging: a) archive (.zip) or b) Inno Setup installer.
The Inno Setup .iss file, which can be used to build the installer, is generated by the cmake configure step. Unfortunately this generation has been set up mostly for use with the Github Actions’ scripts, so the .iss expects you to have the plugin files in a release\RelWithDebInfo folder and so does the archiving code in the relevant Powershell script.
Normally I would just use the GitHub Actions’ Powershell scripts and I actually did for a while, but after contacting the developers to propose some corrections in the plugintemplate repository, I was told that users of the template should not use the GitHub Actions scripts and that they are subject to changes that do not take users into account since they are designed around the CI. Not just that, but there is, at the time of writing, a PR in place to actually modify one of them in a way that would affect me as a user, so I opted to listen to them and try to figure another way.
The solution I opted for was to take Package-Windows.ps1 and extract its dependencies, all into a single Powershell script to avoid any future changes from the repository affecting this. Also added the Intent parameter which allows us to determine what happens from command line. See the next subsection for procurement.
The script can be ran with -Debug switch which allows the Debug logs to become visible.
To run:
./build-aux/Install-Windows.ps1 -Intent Testing/Archive/BuildInstaller
Intent defaults to Testing.
vscode extension #
Task runner is a pet peeve of mine. I don’t like having to run an intermediate step for a task that should be easily accessible and perhaps frequently used in this project.
The difference is that you can only define Tasks in a project and Command Palette only lists Commands. I guess it was time to look into vscode extension development.
Enter obs-plugin-template-tasks, hosted on GitHub. It creates 3 new Commands:
plugtemp.testing: Performs CMake install using –prefix CMAKE_INSTALL_PREFIX.plugtemp.archive: Runs CMake install to${workspaceFolder}\release\${Configuration}and creates a zip archive of its contents which can be found in thereleasefolder.plugtemp.build-installer: Runs CMake install to${workspaceFolder}\release\${Configuration}and creates an Inno Setup installer of its contents which can be found in thereleasefolder.
It also pastes Install-Windows.ps1, if needed, prior to Command execution.